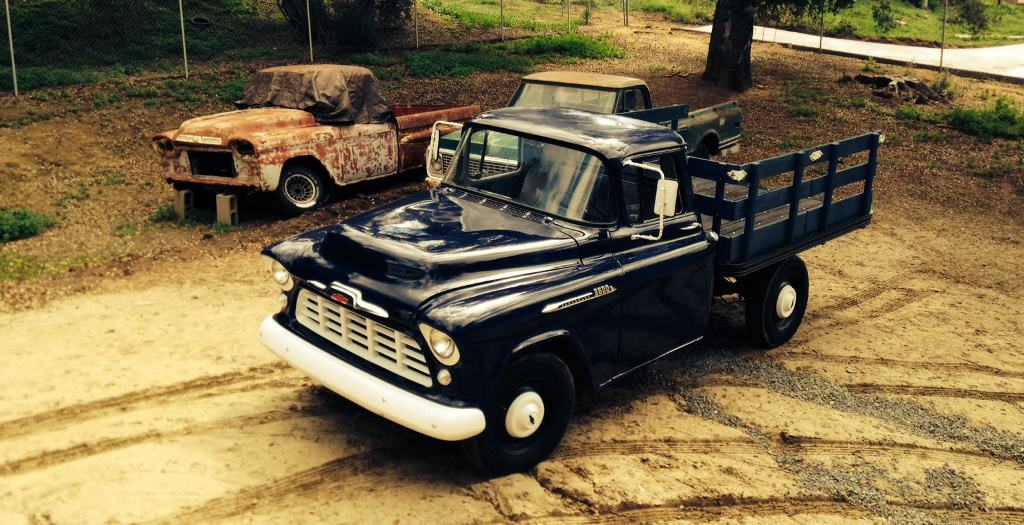
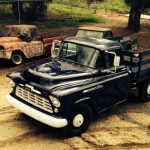
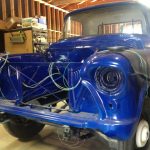
Finally done, here is the After gallery. Click a picture to view the carousel…
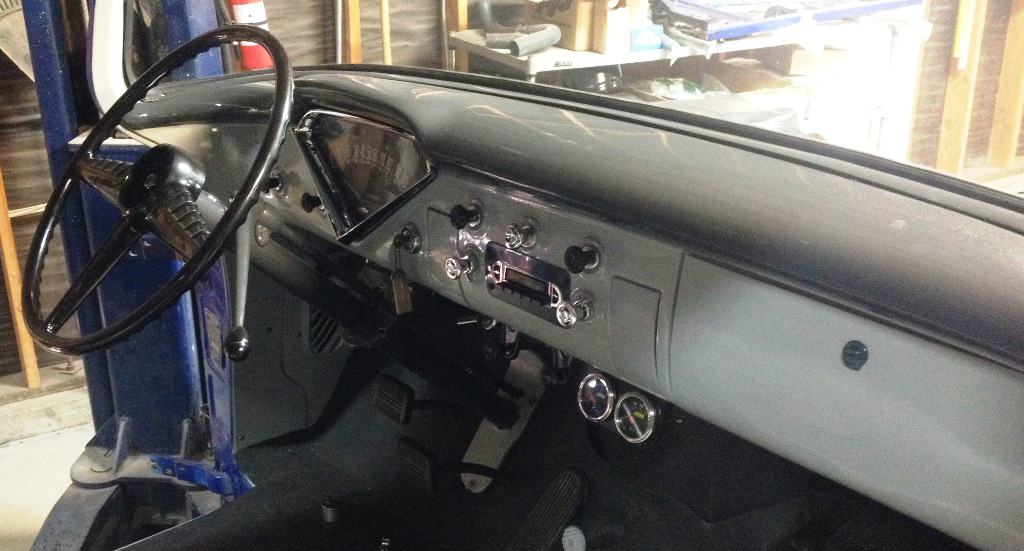
Dashboard nearly complete.
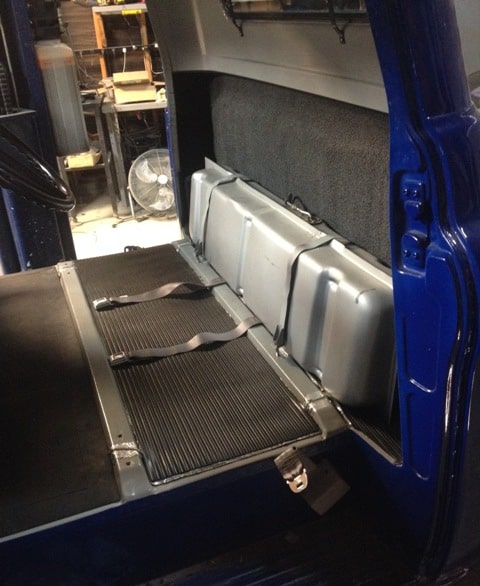
Headliner, dome light, gun rack… check!
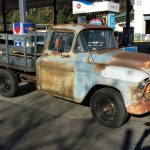
This was the “farm truck” in January 2017, the Before gallery…
The damaged fender and the old fix, lurking under the body filler that was blasted off.
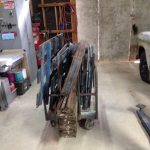
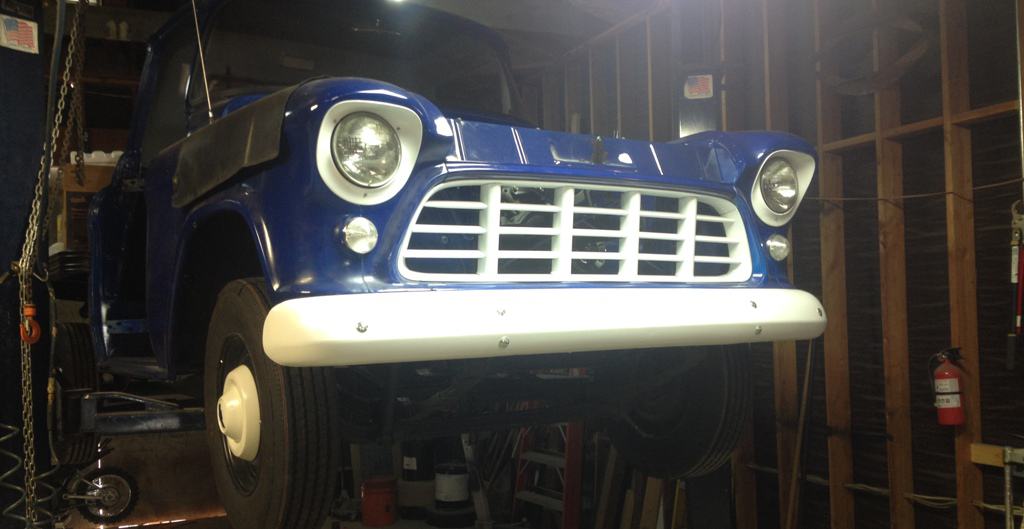
Testing it out, with blankets and towels draped on the line to dampen the snap if the line should break.
LIft off!
Ready for disassembly.
And lastly, this gallery shows some of our work. There is no question that the paint job (and prep and finish) was by far the most time consuming and at times disheartening part of the restoration. The mechanical jobs were mostly straightforward, with just a handful that caused trouble. We got pretty good at rebuilding doors and windows but a broken – yeah, we broke it – passenger side window just as we were finishing the truck gave us some grief… nobody likes to backtrack. All in all, we enjoyed the project and we’re pleased with the result.
More importantly, Lewie is happy to have the truck just as he remembered back in the sixties, but made more enjoyable with the addition of power steering, power brakes, and the overdrive transmission.
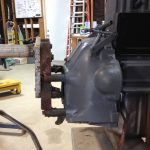
Jim Tronier at work on the frame.
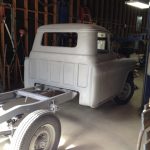
Back in the barn before the next rain. Bare metal will rust if you just drop a bead of sweat on it.
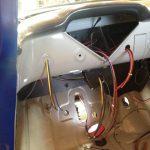
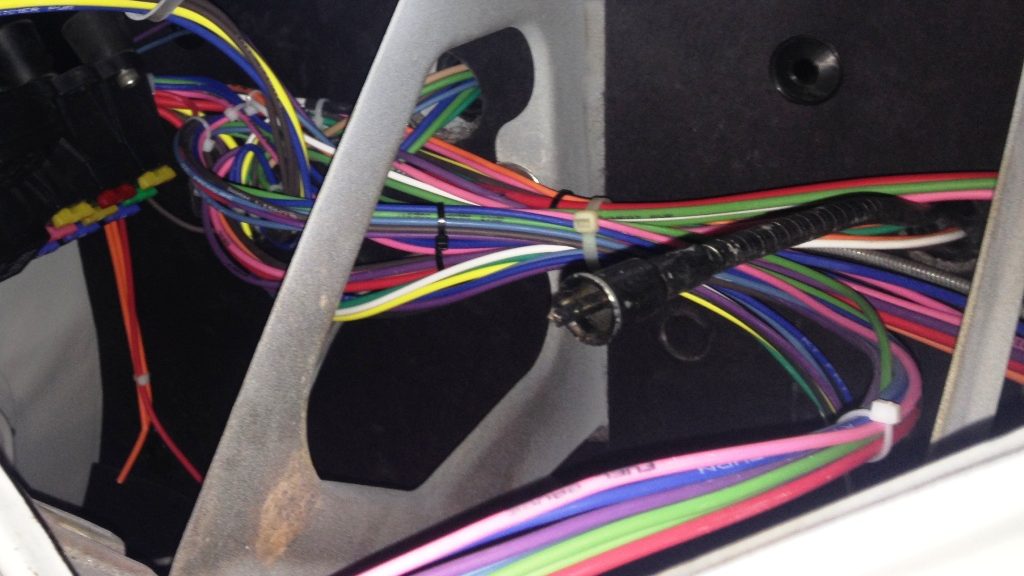
Sorting out the wiring for the dash… easy.
Dash lights spliced into blade connectors.
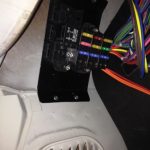
Fuse box above driver-side kick panel. Accessible but out of the way.
The 1956 Chevrolet 3600 “Farm Truck” is the third truck we have built at the barn, and in all three we have used the Rebel Wire 9+3 kit. The first to get the Rebel Wire treatment was Lance’s 1948 3100. We approached that initial job with a little trepidation, but Jeremy White at Rebel Wire held our hands the whole way and answered all of our questions. Having worked with many vendors in our builds, I can testify that customer service just doesn’t get any better than what Jeremy delivers.
Milestone for the ’48 wiring job… the lights work!
At $204.95, the 9+3 kit is a good bargain. In the Farm Truck, we have a full complement of electrical equipment, including the radio, electric wipers, heater, cigarette lighter, a couple after-market gauges, turn signals (an option in 1956) and emergency flashers, single wire alternator, and the electric overdrive unit. We’ve still never used the 3 extra circuits.
Rebel Wire 9+3 kit contents.
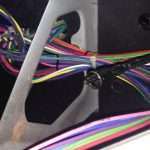
The wires are grouped for front, rear, dash, etc., and each individual wire is labeled every six inches or so along its entire length. The instructions are thorough and straightforward. This is about as foolproof as it gets.
Fuse box in the ’56 was installed above driver-side kick panel. Accessible but out of the way.Sorting out the wiring for the dash… easy.
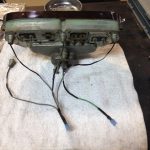
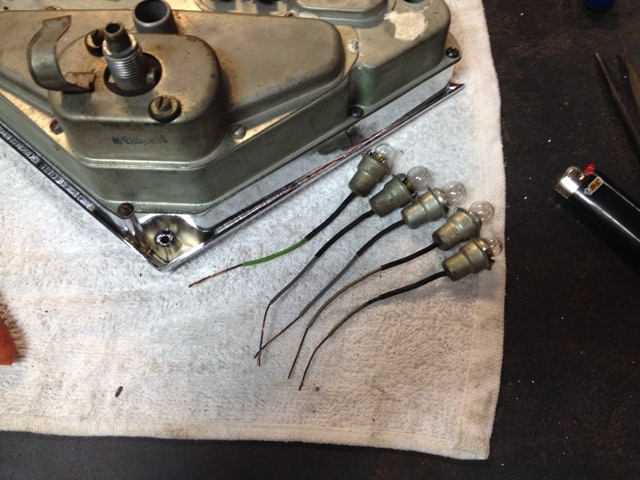
We salvaged the original dash lights and a few inches of the old wires, then spliced them into blade connectors to hook up with the new wiring harness. Later, we added lights for the turn signal indicators.
We utilized the original dash lights and a few inches of old wiring.
We used the Lineman’s Splice to connect old to new. Here’s a link to a YouTube video showing how to do it: NASA approved Linesman Splice
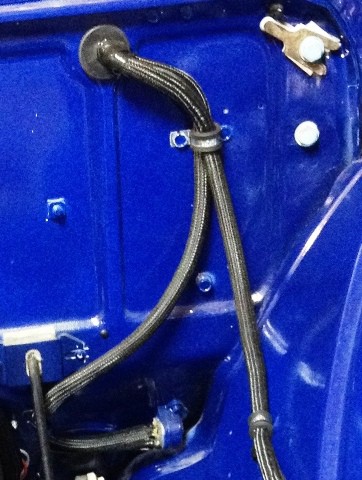
And spliced into blades for connection to new harness.Split “braided” wire insulation was utilized.
We didn’t go crazy trying to hide wires, just picked the appropriate holes in the firewall and then used split “braided” wire insulation. In the San Diego area, we found it in bulk at Marshall’s Hardware off of Miramar Road, and packaged (i.e., pricier) at the Off Road Warehouse in Escondido.
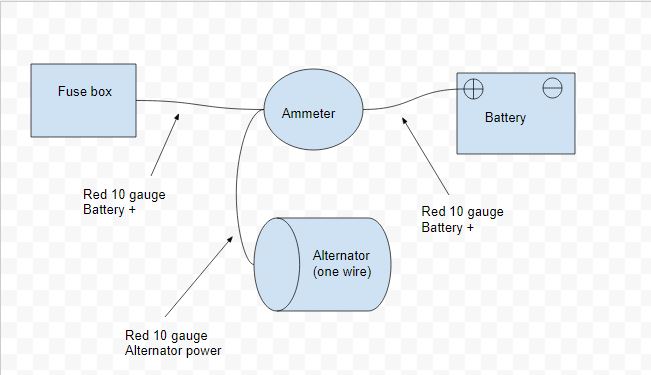
Since the mandate from Lewie was to make this truck just like he remembered it back in the 60’s when his dad bought it, we wanted to utilize the original gauges. It would have been easy, and tidy under the dash.
Ammeter wiring could have been this simple.
But I could imagine a cold, foggy night in San Diego after Lewie has been partying, external speakers blaring his tunes. Time to go home: get in truck, 300 watt radio playing, headlights on, heater on, wipers on, alternator trying to charge the battery, and then pushing in the lighter to smoke his fifth cigar of the evening. Poof.
Voltmeter and electric oil pressure gauges under dash.
After discussing all this with Jeremy at Rebel Wire (and Lewie), we opted for an after market voltmeter, and an electric oil pressure gauge. It looks fine, but does add 7 or 8 wires under the dash, which isn’t quite as tidy. The oil line to the original gauge certainly wouldn’t have been ideal, either. So, a bit of a trade-off, but safety was foremost in our minds.
There’s nothing better in a restoration project than ripping out the nasty old, frayed wiring and replacing it with a new harness. Rebel Wire has really taken the difficulty out of the equation, with great pricing and invaluable customer service… big thanks to Jeremy and Rebel Wire from the crew in the Barn.
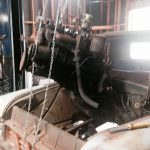
We installed the 235 six without the transmission attached. Even so, we removed all the support structure between the fenders rather than trying to shoe horn it in and bang it against the firewall. Besides, this is a tall truck, and being able to reach in from the front made plumbing and wiring tasks much easier.
Stovebolt six back in the Farm Truck
We exchanged the original 318 Muncie three-speed for a rebuilt 319 with the Borg Warner electric overdrive. The transmissions were the same length so we were able to use the original driveshaft. Installations (with the clutch alignment tool) was a snap.
However, after filling it with GL-1 gear oil, which lubricates both the trans and the overdrive, we were surprised to find a leak on the passenger side of the transmission. I sent a couple photos to the rebuilder – All Trans in Greenville, SC – and they identified the culprit as a pressed-in tapered pin that holds the reverse idler shaft in place.
Hotrodder’s nightmare, a leak!
Bruce at All-Trans said tap a center punch with a hammer in the middle of the pin two or three times. We went further and lightly ground the pin and surrounding area so it was flat, center-punched the middle of the pin, and then randomly punched about a dozen dimples around the around the pin. This stopped the leak, but we decided to spread a layer of JB Weld over it, too, just to be safe.
number nine, number nine, number nine — the reverse idler shaft pin
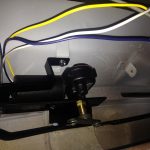
The next step was hooking up all the overdrive relay and kickdown switch wiring, and the lockout cable. It was pretty straightforward, but our kickdown switch location under the gas pedal (on the engine side of the firewall) was a tight squeeze. We hooked up about four feet of wire to each of the four terminals before mounting it.
Bracket for overdrive lockout cable
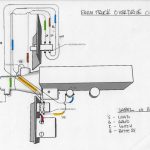
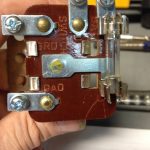
The terminals on the relay that came with the transmission were labelled different than the original item, so that caused a little head scratching. In order to sort it out and to decide where to locate the relay, we used Google’s Sketchup to create a component diagram.
Relay for the Borg Warner overdrive system
As you can see, with the 235 six, we decided to mount the relay on the firewall near the battery, coil, and resistor. Of course, at this point we haven’t tested the overdrive. In fact, that’s on the schedule for tomorrow.
Component/wiring diagram for overdrive system
But we did fire up the engine after hooking up our new wiring harness and all the other controls and plumbing. We knew the engine ran fine from the test stand, but it’s still a milestone to fire it up in the truck.
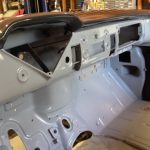
After sandblasting the Farm Truck from “bumper to bumper,” including the interior, we got busy restoring the truck to its former glory. Owner Lewie wanted the two-tone dash as original, and we love the way it turned out. Click on the pictures to enlarge them.
Fresh paint. Now is the time for…
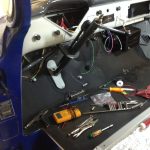
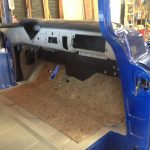
At this stage, spend some time laying on the cab floor deciding what to do next, such as installing defrost vents and the wiper system.
New electric wiper motor; our manifold vacuum will be reserved for brakes. Slots for defrost vents visible in this photo
Since we have added vacuum assist for the brakes, we opted to install an electric wiper motor in lieu of the original vacuum unit. We decided to purchase defrost vents late in the restoration and had to become contortionists to install them. Doable, but not the fifteen minute job it could have been.
Take it from me… add your defrost vents before doing anything else.
The defrost vents, along with many of the parts for the Farm Truck were purchased from Classic Parts of America through their website: classicparts.com. With the appropriate, e.g. 1955-59, magazine-sized catalog in hand, parts were routinely found and ordered in minutes. So, if your thing is exclusively Chevrolet trucks, they are a good resource. Customer service gets a passing grade, too.
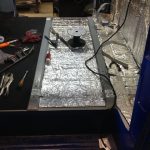
Making it quiet.
Google found this 236 mil Sound Deadener Heat Insulation on the Walmart website: $24 for a 60″ by 40″ sheet. Two sheets got the job done.
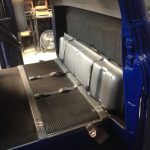
Convenient place for speakers, even with in-cab fuel tank.
The speakers were bought locally at Fry’s, and they just happened to fit like they were made for the Farm Truck’s cab corners
Getting dash wired… note jagged cutout for radio.
Someone got a little carried away with the radio cutout. Since Lewie wanted the oval face “vintage look”radio, we made a face plate ourselves.
What radio fit this opening????Plate for “vintage look” radio.
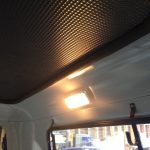
The headliner looks great, but the rubber gasket was a pain to install. We created a little more room under the lip with wood shims and used plenty of lubricant – along with a hammer and block of wood – to urge the rubber onto the lip. For the corners we shaped a piece of wood with a large radius. It was a two-person job.
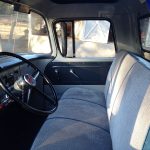
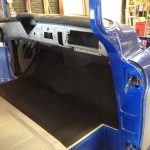
Headliner, dome light, gun rack… check!seat belts, fuel tank, carpet, and mats… done!
Other than the sound of gas sloshing around in the tank, this cab should be quiet! Actually, our ’59 Apache is the same setup, and the fact the fuel tank is in the cab hasn’t been noticeable at all.
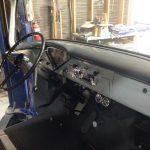
Dashboard nearly complete.
We ditched the original ammeter and the mechanical oil gauge, opting for a couple after-market gauges from JEGS. More about that in the Rebel Wire post, coming shortly. The radio plate got a paint job to match the dark gray on top of the dash.
All in all, we’re pretty pleased with the interior restoration. It looks clean and tidy, and should be quiet, as well.
When the 1956 Chevy farm truck entered the barn in January, it was running pretty well. Vacuum at the intake manifold was at 20 inches and a compression check – wet and dry – showed even numbers across the cylinders. After pulling the engine we did a leak down check and again the numbers were similar for all the cylinders, even if percentages were a bit high. We could hear air escaping through the crankcase breather pipe, indicating the rings weren’t sealing as well as they might. But that check was with a cold engine, so we decided against a rebuild at this time.
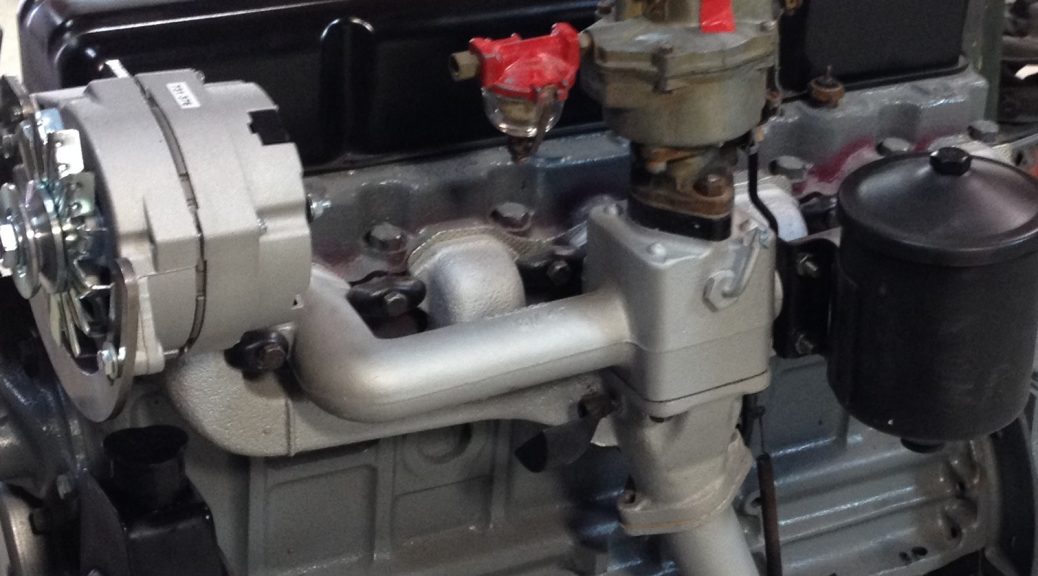
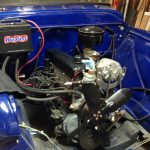
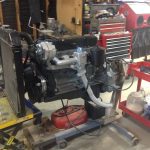
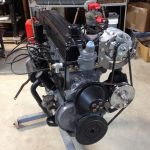
We cleaned and painted the engine, rebuilt the carburetor, installed new spark plugs, set the valve lash and static ignition timing, and then added a power steering pump and alternator.
The 235 six, with fresh paint and added power steering pump and alternator.
We went full quick and easy mode to fire up the engine and check for leaks, using the engine stand as our test bed.
Our engine test bed worked like a charm, simple and easy.
We hooked up our two essential gauges – oil pressure and vacuum – and fired up the stovebolt six. And it ran like crap. Would not idle, vacuum below ten inches, ignition timing out in left field just to get it to run. We grabbed the aerosol can of carburetor cleaner for a squirt around the base of the Rochester and immediately the RPM increased. Bingo: a vacuum leak. No problem, easy fix, right?
We tried every combination of gasket, no gasket, Loctite 518 with gaskets, 518 without gaskets, thick gaskets, thin gaskets… no improvement. We used our flat metal welding table and 600 grit wet/dry paper on both sides of the insulator, and on the carburetor base until we were sure they were flat. Still no improvement.
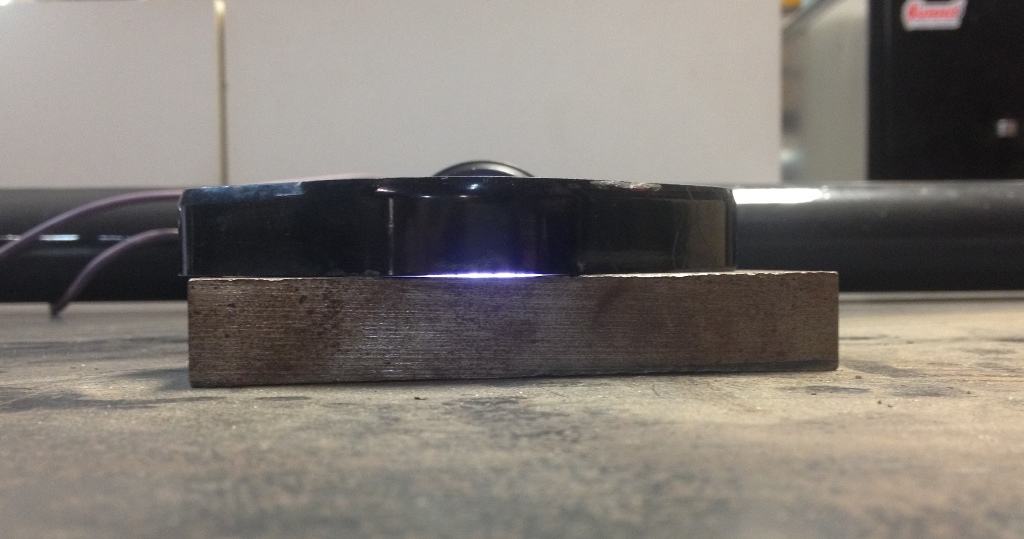
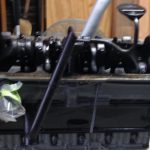
Finally getting smart, we brought out a flat chunk of metal that we keep in the toolbox and laid the insulator on it with a flashlight behind.
Valuable diagnostic tools: a flashlight and a flat piece of metal.Light seen shining under carb insulator, showing warpage.
The insulator was clearly warped. We installed a new (nine dollar) insulator from Classic Parts of America, and, after doing a static ignition timing reset, put it all back together for the umpteenth time, and… eureka! The old six purred like a kitten and once again showed an excellent vacuum reading.
As you can see, Lance is excited… the engine is purring and he’s holding a Corona. We used a thick gasket between the insulator and manifold, but applied minimal torque on the bolts attaching the carburetor to the manifold. I may disassemble one more time and pitch the bottom gasket as I suspect it was a contributing factor with just two bolts holding down the Rochester 1 barrel.
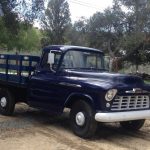
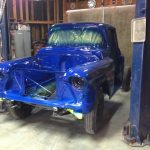
The restoration of Lewie’s 1956 Chevy 3600 has been progressing steadily since our last post. The cab is finally painted inside and out. We chose single stage paints purchased at Meza Automotive Paint in Escondido for exterior and interior. We used our old DeVilbiss gun for the most part, and an inexpensive (but awesome) Harbor Freight detail gun – part of a two gun kit – for the tight spots and for touch-up. The blue exterior is surprisingly bright and we’re all anxious to see it on the road with the white bits installed (bumper, grill, hubcaps, mirrors, etc).
Truck cab painted brilliant blue. It pops!Interior a little more tame in shades of gray, as it was originally.
For the front part of the cab floor we bought the original style jute and cardboard inner firewall cover, and the precut jute pad and rubber floormat. All these were purchased from Classic Parts of America.
Inner firewall cover and precut jute pad.Precut and punched rubber floormat. I wish I had done this in the Apache.
We will use heat shield insulation on the rest of the cab floor, and under the headliner.
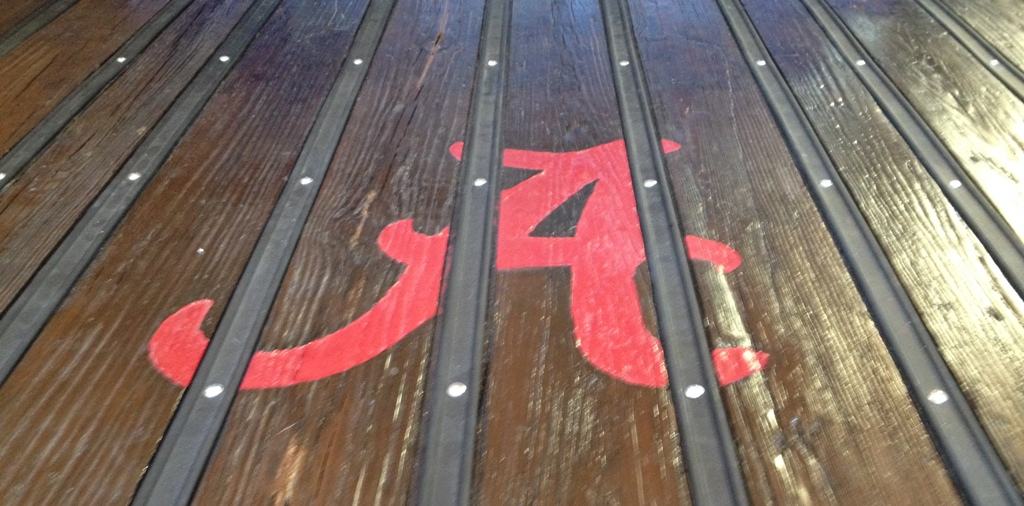
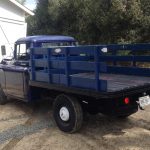
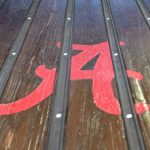
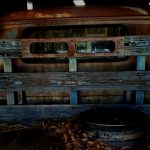
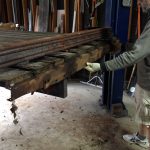
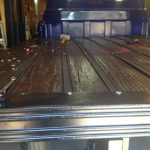
Lewie took on the project of refinishing his original wood bed, and from the crimson red “A” it should be apparent where he – and the truck – lived when the it was purchased a few decades ago.
Installation of frame, bed wood, and strips.
The original metal strips were rusted, and junked. We bought these replacements from Mar-K Manufacturing in Oklahoma City… simply filled in the convenient form describing the strips for our bed (length, hole sizes, hole locations) and everything fit perfectly. Turn around time was about one week!
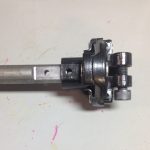
Mechanical tasks were also getting finished. The CPP power steering kit required cutting the shaft and column, and we elected to chop off even more to move the steering wheel away from the driver – Lewie is not petite.
Steering shaft shortened, double D cut, and drilled for a pin or bolt.
We used Josh Sadler’s Yoshifab, right here in Fallbrook, to cut the double D into the shaft and drill a 1/4 hole for a bolt or roll-pin. We nearly lopped too much off the shaft – the column shifter has to clear the dash!
Flanged bearing inserted into PVC coupler. We cut the coupler just past the end of the bearing.
To keep the outer column from flopping around, we utilized a flanged bearing inserted into a piece of PVC pipe and pressed into the bottom end of the column.
Bearing installed into bottom end of steering column.
Once the engine and transmission are in place, we will install the shifter mechanism onto the steering column. The slotted hole visible in the above photo allows positional adjustment so that the shift rods operate on the trans levers correctly. We will then need to chop a couple inches off of the upper shift shaft (under the dash) since we shortened the steering column.
Shifter shaft needs to be shortened a couple inches, exact amount tbd later.
In the next post, we chase down a vacuum leak in the 235 six.
One of the peculiarities of the 235 c.i. six from our 1956 3/4 ton “Farm Truck” is that the bell housing is installed before the flywheel. Couple that with our desire to clean up, paint, and re-install the oil pan, and it became obvious that we should put the monster on an engine stand so we could rotate it.
All dressed up, the six weighs around 630 pounds, and it’s longer and taller than the Chevy small block V8. So we had concerns about putting it on a stand. We didn’t trust our own stand so a friend’s more stout-looking stand (1000 lb. rating) was borrowed.
Two inch square tube extension with wheels, added for stability.
Still, we had concerns about the length of the engine with bell housing installed, and could imagine it tipping over as we rotated it or moved it around the shop. To ease our minds, we added a 2 inch square tube “T” extension, with wheels, to the front of the stand for stability. We had the wheels in the shop, and the 5 foot long square tube set us back $6.50, so it was cheap insurance.
Fixture attached so axis is near vertical center of gravity
Since the bell housing sits considerably below the vertical center of gravity of the six, we attached the stand’s fixture such that round tube axis was much higher than bolts attaching it to the bell housing. It looked odd, but with grade 8 bolts holding it all together, there was no problem. We also backed up the upper bell housing bolts with nuts instead of relying on the bell housing’s internal threads.
Engine stand attachment, up close.
We employed a four-foot long bar to rotate the engine once it was mounted to the stand, and we left the chain hoist attached for the first 90 degrees of rotation until we felt the balance was, indeed, going to be acceptable. With the long bar helping matters, it was easy for one person to rotate the engine with complete control. We pinned our “T” addition to the original stand with a spare bolt so that it would stay in place as we moved the engine around the shop.
Chevrolet 235 six mounted on our engine stand, ready for final assembly.
All in all, it turned out to be no problem at all mounting the 235 six to our stand.
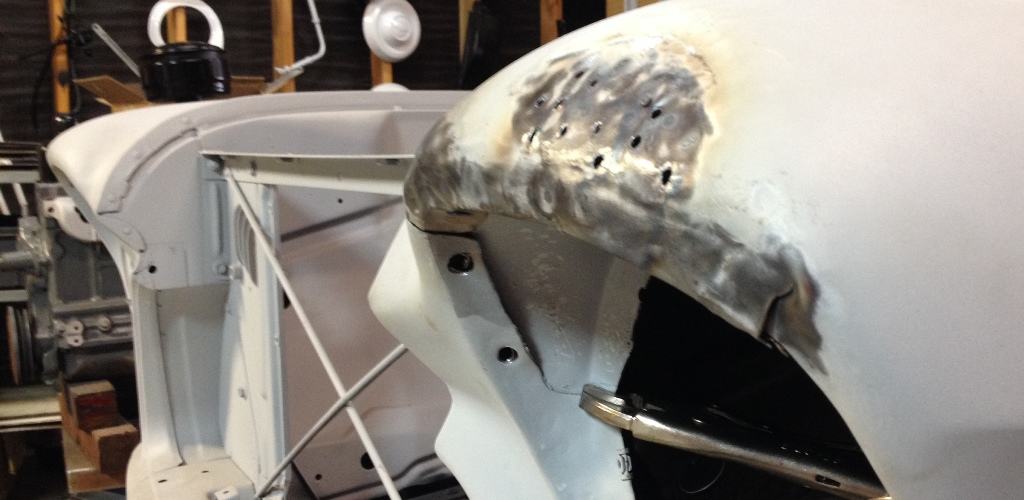
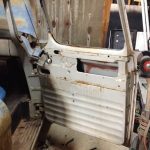
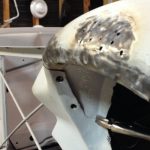
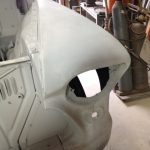
Some years ago, Lewie’s truck lost a skirmish with tree, which became apparent when we had the truck sandblasted from bumper to bumper. The repair resulted in some wrinkles and a knife edged front fender, above the headlight.
The damaged fender and the old fix, lurking under the body filler that was sandblasted off.
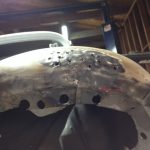
The fender should have a flattened face as it curves around the upper part of the headlight. The original repair obviously involved a dent puller, as evidenced by the numerous holes.
Passenger side fender.
We considered replacing the fender with an after market item, but at a cost of $3-400 plus quite a few hours of removal and installation time, we decided to repair it.
Arrows indicate three of the nine spot welds that were drilled out.
The first order of business was gaining access to the inside of the fender under the damaged area so that we could apply some brute force. We drilled out the spot welds and removed the sheet metal section that was blocking our access. Then, four cuts were made so that we could bend the flange forward and open the damaged area for some hammering.
With access gained, we hammered and bent the fender into shape.And then lined up the holes and clamped the removed sheet metal back into place for re-welding.Not perfect but much closer to the original shape.
After re-attaching the inner section by welding the cuts and the drilled-out spot welds, we mixed up some body filler to begin final shaping of the repair.
Filler applied, ready for sculpting.Taking shape after some sanding.Head-on view of the repair before primer was applied.
Each of our trucks ends up with a phrase that describes our pass-fail level. With the farm truck that phrase is “Not Barrett-Jackson” (NBJ for short). This truck is being built for Lewie’s enjoyment, not for the show circuit or resale.
Primer applied and ready for a closer inspection.
The owner’s grade after taking a look at the result of about one day’s work? “It passes… NBJ.” The repair versus replacement decision worked out great in this case and we saved Lewie a few hundred bucks.
This fender was the most difficult of the body repairs, other than the rusted out bottom of the passenger side door. That has been addressed and will be the subject of another article. With the dings and dents all repaired, now it is time for sanding in preparation for paint.
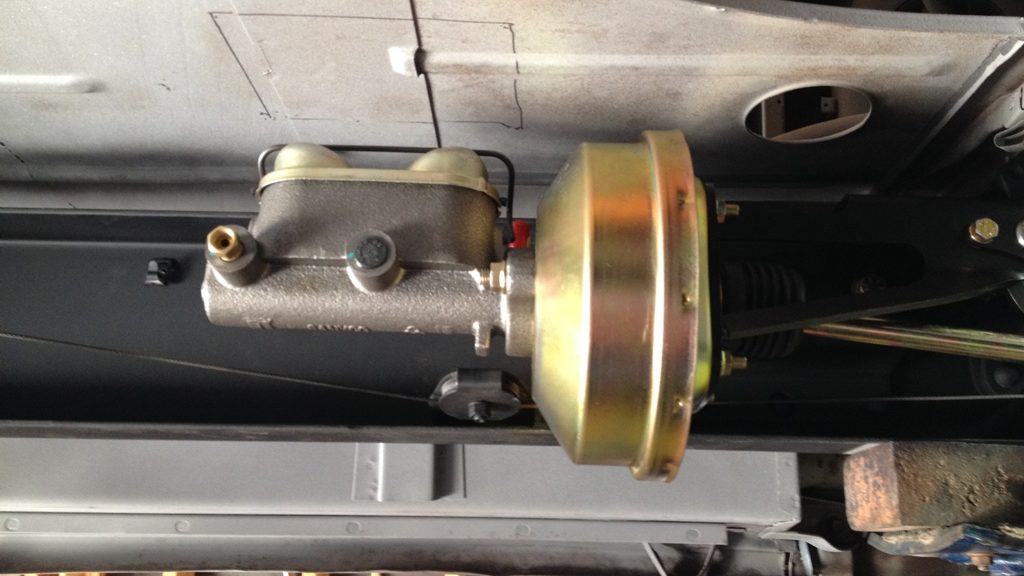
Although the 1956 Chevy 3600 flat bed is going to be restored to “as original” for the most part, Lewie did insist on a few upgrades for safety and drivability. At the top of the list was adding a power booster system so that the four drum brakes could haul the 3/4 ton truck to a stop more effectively and with less effort.
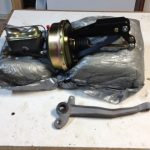
The CPP 5559BBD kit and our original brake lever.
Classic Performance Products had the perfect product for the job – their frame mount brake booster kit for drum brakes (part number 5559BBD, accessible at classicperform.com). We purchased it through Summit Racing to take advantage of their pricing and free shipping.
Though we were a little concerned with the lack of documentation, it turned out that the installation was straightforward and simple. From start to finish it took us three hours to complete the installation. not including new brake lines, which haven’t been made up yet.
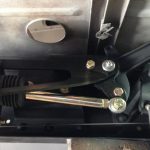
The handbrake pulley had to be moved rearward a few inches to clear the diaphragm housing.
In addition to the brake line replacement, which shouldn’t take more than an hour to install, we had to make two other modifications. First, we had to move the handbrake cable pulley rearward on the frame a few inches to clear the large diaphragm housing. These were the only new holes in the frame, since the new master cylinder and booster utilize the same mounting holes as the original.
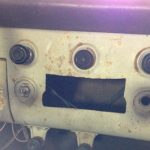
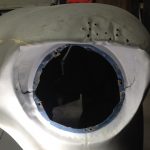
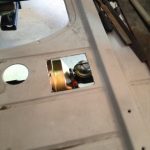
The second modification required for this kit is to create a new access hole in the floor of the cab, since the original master cylinder is several inches forward from the CPP unit.
New master cylinder access on the cab floor.
We didn’t want to cut into the transverse rib on the cab floor, nor the strengthening grooves in the floor, so the access hole is not directly over the master cylinder reservoirs. But we made the access opening large enough to fit your hand through to remove the cap and perform fluid maintenance.
The original brake lever is used, and fit perfectly.
At around $300 plus the cost of new or modified brake lines, the kit is a bargain, especially when the ease of installation is factored into the equation. We will utilize braided stainless steel lines if we can get those made up economically, otherwise we will opt for hard lines like the original setup.
CPP 5559BBD installed except for new brake lines. The access hole drawn here above the MC would have cut through strength structures of the cab.
Summing it up, we’re very pleased with the CPP kit and we are looking forward to a little more stopping power. After all, Lewie, Lance, and I all live in Hidden Meadows in northeast San Diego county, and leaving the ‘hood requires dropping several hundred feet in elevation down a steep grade to access I-15 and the rest of the world. If this kit performs as well as it looks and installs, it will be making an appearance on the ’59 Apache soon.
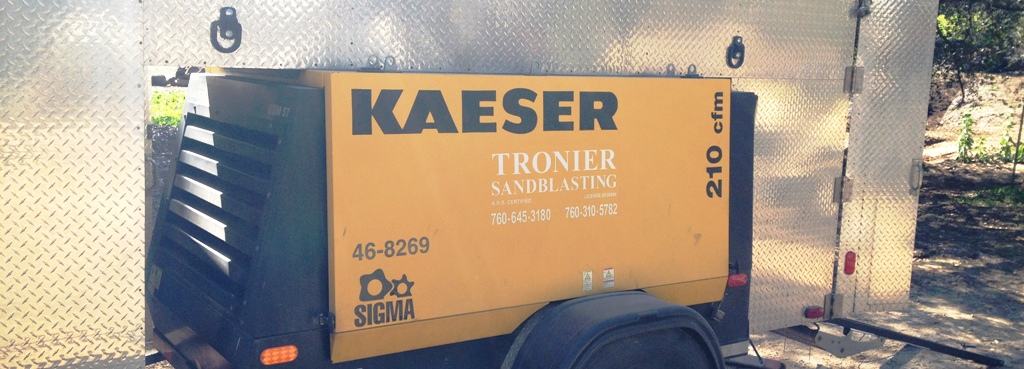
After assessing the efficacy of our own blasting equipment, we decided professional help was needed. Fortunately, just down the street in Fallbrook we had driven hundreds of times past a sign advertising sandblasting by a company called Tronier Sandblasting. We phoned the number – 760.645.3180 – and asked Tronier, father and son, to come out and take a look at our project. The rate to blast the entire truck seemed reasonable, so we set a date.
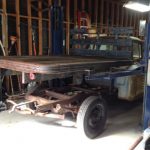
The ’56, stripped of glass, hood, engine, and the flatbed, ready for blasting.
They agreed to do the job at our site, but first we had to figure out if we could get the truck back into the barn if we rolled it out. We had a 2000 lb. rated, 24 volt winch in the shop so we rigged it up in between our two post lift using a stout piece of rectangular tubing. Rather than just a straight pull, we felt using a pulley on the load would be safer, reducing the tension on the rope by half.
Winch setup.Testing it out, with blankets and towels draped on the line to dampen the snap if the line should break.
Satisfied we could get it done, we proceeded. In between rain storms, we found two clear days to do the job.
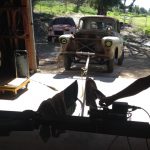
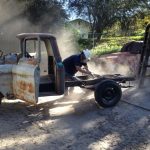
Tronier’s custom made trailer holding their power, compressor, ladders, and 400 feet of high volume hose.Jim Tronier at work on the frame.Sometimes laying down on the job.
What Jim estimated could be a one day job, turned into two days plus, but the price remained the same even though we offered to sweeten the deal. I can’t say enough good things about Tronier; for sure we will have them back to blast the ’58 GMC, seen sitting in the backround.
Interior blasted.Engine bay done.All done but for the bits removed: hood, flatbed frame, etcBack in the barn before the next rain. Bare metal will rust if you just drop a bead of sweat on it.
The Farm Truck was really in excellent shape, with only the steps on both sides and one corner of the hood needing any rust repair. But blasting away any body filler will reveal all – including some damage to the left front fender, and a couple ripples in the right front fender. All in all, though, it is in fine shape for a sixty year old truck.
Damage revealed.
The flat face on the driver side fender has been pushed under, creating a knife edge look. This is what it should look like.
The correct look.
Lance and I thought we’d be able to get the sand wedges out and hone our bunker shots, but the kids were quick to claim the beach as their own.
Tommy, Lucia, and Tugger stake their claim to the new play area.


 overdrive transmission")